Tag: Beginners Guide

  • Life Skills Guide: Which Professions to Level First?

    Life Skills Guide: Which Professions to Level First?

    The life skill system in Ragnarok: The New World is not optional side content. It feeds directly into your combat power through enhancement stones. This guide covers which professions to level, which ones can wait, and how the vitality economy works for F2P players.

    Key takeaways:

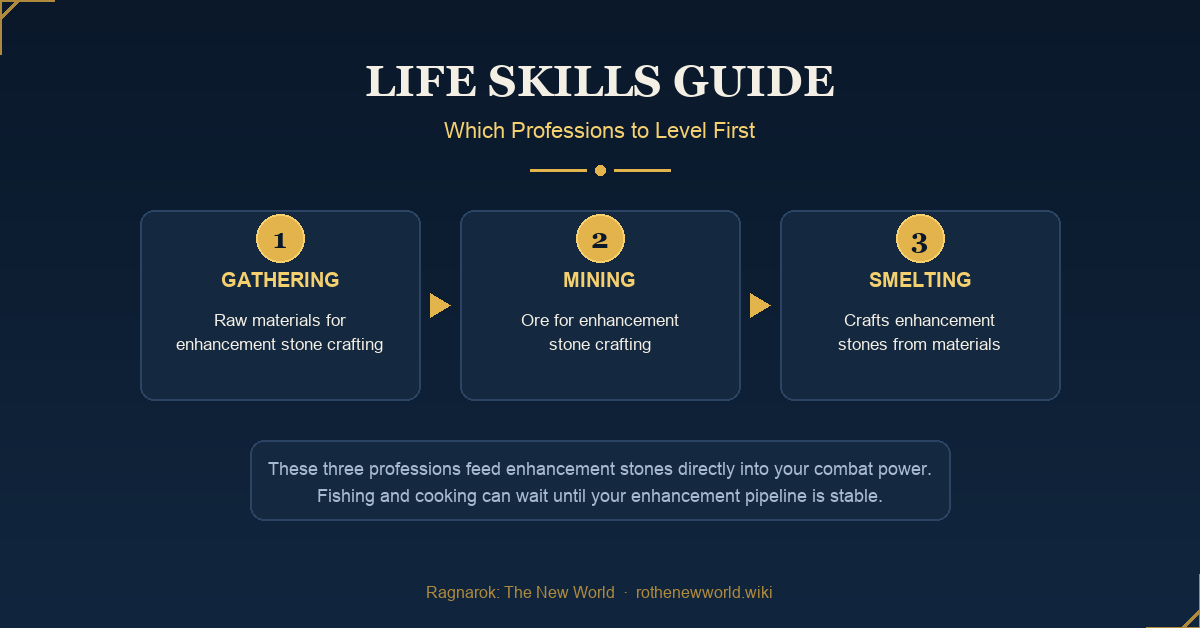
    • Level gathering, mining, and smelting first. These three professions feed enhancement stones directly into your combat power. Each amplify threshold (+10, +25, +40) unlocks bonus stat lines on your gear. The material demand is high throughout the early and mid-game.
    • Fishing and cooking can wait. They produce buff foods that sell, and personal use helps, but the return is lower than enhancement materials in the first two months. The database confirms 16 recipes across 6 towns, gated behind the Private Chef quest.
    • Spend your daily vitality. Event vitality adds up. Skipping days widens the gap.
    • Monthly card players get a vitality advantage. Two shop items (Western Herbal Tablets + Honey King) grant 560 extra vitality per day through Star Stones. The gap over two months is significant.
    • Gold is the bottleneck. Every life skill level costs gold. Pick your three and commit.

    The life skill system

    All life skills are learnable. Each one costs gold to level up, and the gold cost is substantial.

    The available professions:

    ProfessionWhat do you get from it?Priority
    GatheringRaw materials for enhancement stone craftingHigh
    MiningOre for enhancement stone craftingHigh
    SmeltingCrafts enhancement stones from gathered materialsHigh
    FishingFood buff ingredientsLow (early game)
    CookingMakes foods that is used for character buff. Can be for sale or personal useLow (early game)

    How gathering, mining, and smelting translate to power

    These three professions feed the enhancement system. Enhancement stones raise your gear’s amplify level. Each piece of gear has amplify thresholds that unlock bonus stat lines.

    Here is what you get at each threshold, using a typical weapon as an example:

    Amplify LevelWhat UnlocksExample Bonus (Shadow Weapon)
    +10First bonus stat lineRanged Magic DMG +2%
    +25Second bonus stat lineMATK% +3%
    +40Third bonus stat lineRanged Magic DMG +5%

    These bonuses are not small. Stacked across your weapon, armor, cape, shoes, and accessories, the amplify system is one of the biggest sources of combat stats in the game. A player who neglects enhancement falls behind fast.

    The material pipeline works like this:

    1. Gathering collects raw materials from the field.
    2. Mining collects ore nodes.
    3. Smelting combines gathered materials and ore into enhancement stones.

    Without these three skills leveled, you rely on the market or event drops for enhancement materials. The demand is high and the supply from events alone is not enough. Early game basic stones get consumed quickly, and moving to the next equipment tier requires the ultimate weapon enhancement stones. Being self-sufficient means leveling all three.

    The database confirms the full material ladder:

    Enhancement MaterialLevel BandSource
    Enhance StoneLv 1 to 20Elite/Mini event rewards
    Weapon Enhanced Metal IWeapons + Accessories 21 to 40Guild Shop Lv.1 100 Merit; Elite drops (12.5%)
    Weapon Enhanced Metal II41 to 60Guild Shop 200 Merit
    Weapon Enhanced Metal III61 to 80Guild Shop 400 Merit
    Weapon Enhanced Metal IV80+Guild Shop 800 Merit
    Armor Enhanced Spirit Stone IArmor/Capes/Shoes 21 to 40Guild Shop 100 Merit; Elite drops (12.5%)
    Armor Enhanced Spirit Stone II41 to 60Guild Shop 200 Merit
    Armor Enhanced Spirit Stone III61 to 80Guild Shop 400 Merit
    Armor Enhanced Spirit Stone IV80+Guild Shop 800 Merit

    Monsters drop only Metal I and Spirit Stone I. Normal monsters have a 0.007% drop rate. Elite variants (Ringleader, Swift, Solid, Furious, Elusive) drop them at 12.5%. Tiers II through IV have no monster source. Guild Shop Merit is the only path for those.

    The recommended path: gathering, mining, smelting

    Focusing on three professions for the first one to two months:

    1. Gathering. Collects raw materials.
    2. Mining. Collects ore.
    3. Smelting. Crafts the enhancement stones from gathered materials.

    The reasoning: enhancement stone consumption is huge. The gold cost to level all five life skills is too high for F2P and low-spending players. Budgeting wisely means picking the three professions that feed your combat power directly.

    Other life skills: fishing and cooking

    Fishing and cooking are not useless. They are just lower priority than the enhancement trio. Here is what each one does.

    Fishing

    Fishing supplies ingredients for cooking. The game has fishing spots across multiple maps. You catch fish that serve as recipe materials for buff dishes.

    Fishing does not produce enhancement materials. It does not raise your combat stats directly. Its entire value comes from feeding the cooking system, which is why it pairs with cooking and not as a standalone profession.

    Cooking

    Cooking starts with the Private Chef quest (unlocked in Prontera). After completing it, you can find cooking stations across six towns:

    TownRecipe
    PronteraGrape Wine, Cherry Jelly, Blueback Soup
    IzludeGreen Salad, STR Dish, Steamed Scorpion
    MorrocSupreme STR Dish, Purple Vadon Congee
    GeffenMagic Broth, VIT Dish
    AlbertaMana Chowder, Squid Tentacle Soup
    PayonFried Sweet Potato, Apple Pudding, Red Fish Hotpot

    The dishes that name a stat directly (STR Dish, VIT Dish, Supreme STR Dish) suggest the buff system grants temporary stat bonuses. Mana Chowder likely restores or boosts max mana. Magic Broth likely boosts magic-related stats.

    Cooked dishes can be sold for in-game currency. Players who want buff foods without leveling cooking themselves will buy from the market. If you want to earn in-game currency, cooking has a place. But the demand is limited compared to enhancement materials.

    For everyone else, fishing and cooking are a later-game investment. Once your enhancement pipeline is stable and you have spare gold, you can loop back and level them.

    The vitality system

    The life skill system runs on vitality points. You get a daily allocation. You also earn vitality from events:

    • Peers arena
    • Challenge activities.
    • Daily activity completions

    Run your dailies every day. The vitality from events adds up, and skipping them widens the gap between you and consistent players.

    The premium vitality gap (P2W)

    There are two shop items that grant extra vitality every day:

    • Western Herbal Tablet. Gives 460 vitality.
    • Honey King. Gives 100 vitality.

    Together, they add 560 vitality per day. These are purchasable with Star Stones, the premium diamond currency that monthly card players receive.

    Let’s do the math: 560 extra vitality per day × 30 days = 16,800 extra vitality per month. Over two months, that is 33,600 more vitality than a free-to-play player. That gap translates directly into more enhancement stones and faster gear progression.

    F2P and low-spending players: compare yourself to players with similar spending levels. Do not measure against monthly card players who get the extra vitality. Play at your own pace.

    Gold: the hidden cost

    Upgrading life skill levels costs gold. The gold consumption is high, and free-to-play players need to budget carefully. This is another reason to focus on three professions instead of spreading gold across all five.

    Source:

  • How to Properly Utilize Field Combat? Daily Budget, Leveling, and What to Farm in Ragnarok: The New World

    How to Properly Utilize Field Combat? Daily Budget, Leveling, and What to Farm in Ragnarok: The New World

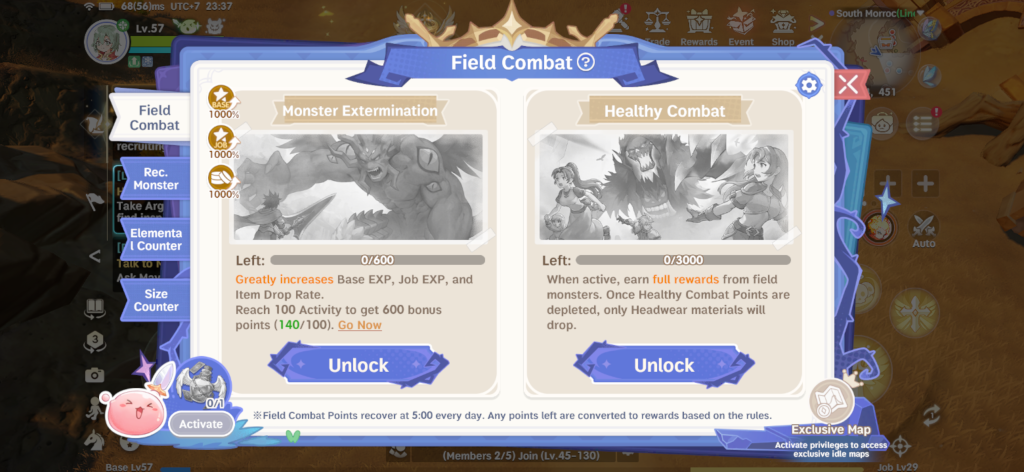
    You get 3,600 field combat points every day. That budget decides how much EXP and how many items you get from hunting in the field. Kills inside the budget pay full rewards. Kills beyond it pay almost nothing.

    Most players never check this number. They burn points on the wrong monsters, then wonder why leveling stalls.

    Here’s what this guide covers: how the system works, the leveling rules, what to farm, and the daily loop that spends it.

    The field combat system table

    PoolPoints per dayWhat it does
    Monster Extermination600EXP and drop rates boosted to 10x (1000%)
    Healthy Combat3,000Full EXP and item drops from field kills
    Total field combat3,600Everything above this pays headgear materials only

    You will get the 600 monster extermination points when your daily activity hits 100. So, do your normal dailies and you will hit it without trying. These 600 points are the best farming you will do all day, because the 10x boost applies to both EXP and drops.

    The 3,000 healthy combat points are your base budget. Kills inside them pay full rewards. Kills beyond the full 3,600 drop headgear materials only. Healthy Combat does not carry over to the next day. Unused points reset at 5:00 AM, and the game returns part of what you did not use by mail.

    The reset time matters. Check your server’s stamina bar timer. It does not always match local midnight.

    Spend the 10x pool first

    Do your dailies until activity hits 100. Claim the 600 Monster Extermination points and spend them on your best farming spots before anything else.

    Keep Healthy Combat off while you do quests. Turn it on only when you are ready to farm the field because quest kills do not need the budget. Toggle it on for the farming session and you get full value instead of leaking points into mission cleanup.

    The 110% rule: how leveling actually works

    Monsters 1 to 5 levels above you give 110% experience. Same-level monsters give 100%. Anything more than a few levels below drops to almost nothing.

    A level 50 monster farmed at level 55 returns 2 EXP per kill. A level 60 monster returns 341. That’s a huge difference between the right level gap and the wrong one.

    Use the in-game monster index sorted by level. Open the Recommended Monster list before you spend points. The game flags targets with the 110% bonus active. A fast-kill 110% target beats the “ok” mobs every time.

    BracketWhat works
    1 to 20Story quests and starter zones; short side quests
    20 to 40Field zones, party farming, monster-type matchups
    40 to 60Dungeons, regional story, daily instances; the 50s need field combat discipline
    60+Weekly content, MVP parties, event quests

    The Quest Board is the other half of daily leveling. It unlocks at level 32. Refresh the board until tasks show orange quality before accepting. Orange commissions pay more EXP and Zeny per minute than white or green ones.

    Board clears also pay Magic Gloves. The gloves spin the Adventure Wheel for Kafra Blind Boxes, treasure maps, Gold Coin, and Adventure Coin. Your first three board rounds take you from 33 to roughly 36. That is when the daily field battle counts unlock.

    What to farm with your points

    Cards: the progress-bar system

    Each monster drops one specific card. A progress bar fills as you kill that monster. At 100% the card drops guaranteed, and the bar resets. That bar is the real farming loop, and field combat are the fuel.

    Green and blue cards fill fast. The Yo-yo card went from 0 to 100% in one day. Purple cards fill slowly. Archer Skeleton moves about 10% per full 3,600-point day, so plan around ten days for that card. Minorous moves about 1.5% per day.

    Related: Life Skills Guide – your daily vitality also fuels gathering, mining, and smelting. See how to spend it across all life skills.

    Spend your points on monsters whose cards your build actually uses. Do not spend them on whatever is nearby.

    Normal monsters carry the card at roughly 0.02% per kill for green and blue cards, or 0.001% for purple. Elite variants change the math completely:

    VariantCard drop rate
    Normal monster, green/blue card~0.02%
    Normal monster, purple card~0.001%
    Elite (Ringleader/Swift/Solid/Furious/Elusive)3.25% (green/blue), 1.3% (purple)

    Elites respawn every 2 minutes at random field locations. You can also summon them with Dead Branches. They have roughly 10x HP, so farm them only if you one-shot them. A one-shot elite is the fastest card farm in the game.

    Refine materials

    The full table lives in the refine materials guide. Short version: normal monsters drop Elunium and Oridecon at 0.002857%. That is a dead end. Elites drop them at 5% plus Energy Core at 20%. The level-40 MVPs Angeling and Deviling drop Elunium and Oridecon at 28.57% and Energy Core at 50%.

    Refine materials are an elite-and-MVP game, not a normal-grind game.

    Bound Zeny and steady income

    178 normal monsters drop Bound Zeny at 10%. The 40 to 55 bracket (Yoyo, Vadon, Verit, Wolf, Zenorc, and friends) pays Bound Zeny plus Element Cores while you chase cards. That is passive income that funds the rest of your plan while the card bar fills.

    Your daily routine

    PriorityActivityWhy
    #1Daily check-in + claim mailFree coins, food, event tokens, 5 seconds
    #2600 Monster Extermination points on a 110% target10x EXP and drops, the best value in the game
    #3Quest Board, refreshed to orangeBest EXP per minute outside the 10x pool
    #4Time Corridor, all daily entriesGear materials beat most field farms
    #53,000 Healthy Combat points on your card targetFull rewards, card progress
    #6Guild dailies + Cat CargoGuild Contribution, Adventure Coin, Elunium, Oridecon
    #7Paradise DanceZero-combat Paradise Coins, under a minute
    #8MVP and Mini killsRoyal gear, cards, participation loot
    #9Everything elseExploration, chests, gathering

    Time Corridor is never optional for gear. It pays Royal gear and gear materials that no field farm matches. The MVP and Mini reward counters allow roughly 3 MVP and 5 Mini rewarded kills per day. Participate even if you only touch the boss. Participation loot exists.

    The timed events that pay

    The event calendar runs on server time. These are the ones that pay farming-relevant items:

    EventSchedulePays
    Mimic ChestWed, Sat, Sun 8:00-23:00, every 30 min, lasts 20 min, party of 3-5Royal gear, Orange gear, card books, refine materials
    Bounty HuntMonday 12:00 to 5:00 next dayElunium, Oridecon, Energy Core, crystal chests
    Rift RaidWed and Sun 10:30 to 5:00 next dayRoyal accessories, Ultimate Skill fragments
    Gold HeistMon and Fri 12:00-19:30, hourlyZeny, Guild Contribution, Royal gear
    Hazy ForestThu 21:30 (15 min)Enriched Elunium, Purple Card, pet eggs
    Forgotten LandSat 12:00 through the weekendAnvil, Kafra Blind Box, EXP
    Hoppy QuizFri 21:00Starstones (champion prize = 3,280, the Magic Broom price)

    What you are actually saving for

    The game throws a lot of systems at you. Strip them away and the farming goals are four:

    1. Your weapon to +10, then +15. Safe refine means failed attempts never drop your level, so every material spent is permanent progress. Resonance Level 2 at all +10 is the community’s F2P target before chasing higher.
    2. The damage cards for your build. Weapon and accessory slots first. Archer Skeleton, Bongun, Orc Archer, Magnolia, and their class equivalents. The card progress bar makes these a deliberate ten-day project, not a lucky drop.
    3. Royal gear from Time Corridor, MVP, and Mimic Chest. Gear materials from the corridor fund upgrades; the chests and bosses drop the pieces.
    4. Refine material stockpiles. Elunium, Oridecon, and Energy Core are the bottleneck for every +10 and +15 push. Elites and MVPs are the source.

    Spend field combat points only on monsters that advance one of these four goals. That is the whole trick.

    Bottom line

    Do your dailies to unlock the 600 Monster Extermination points. Spend those on a 110% target first. Run the Quest Board at orange and Time Corridor every day. Then burn the remaining 3,000 Healthy Combat points on the monster whose card or materials your build needs.

    Elite one-shots are the fastest card farm in the game. Normal grinding for refine materials is mathematically a waste of time.

  • How to Change Mount in Ragnarok: The New World

    How to Change Mount in Ragnarok: The New World

    Changing mounts in Ragnarok: The New World is easy.

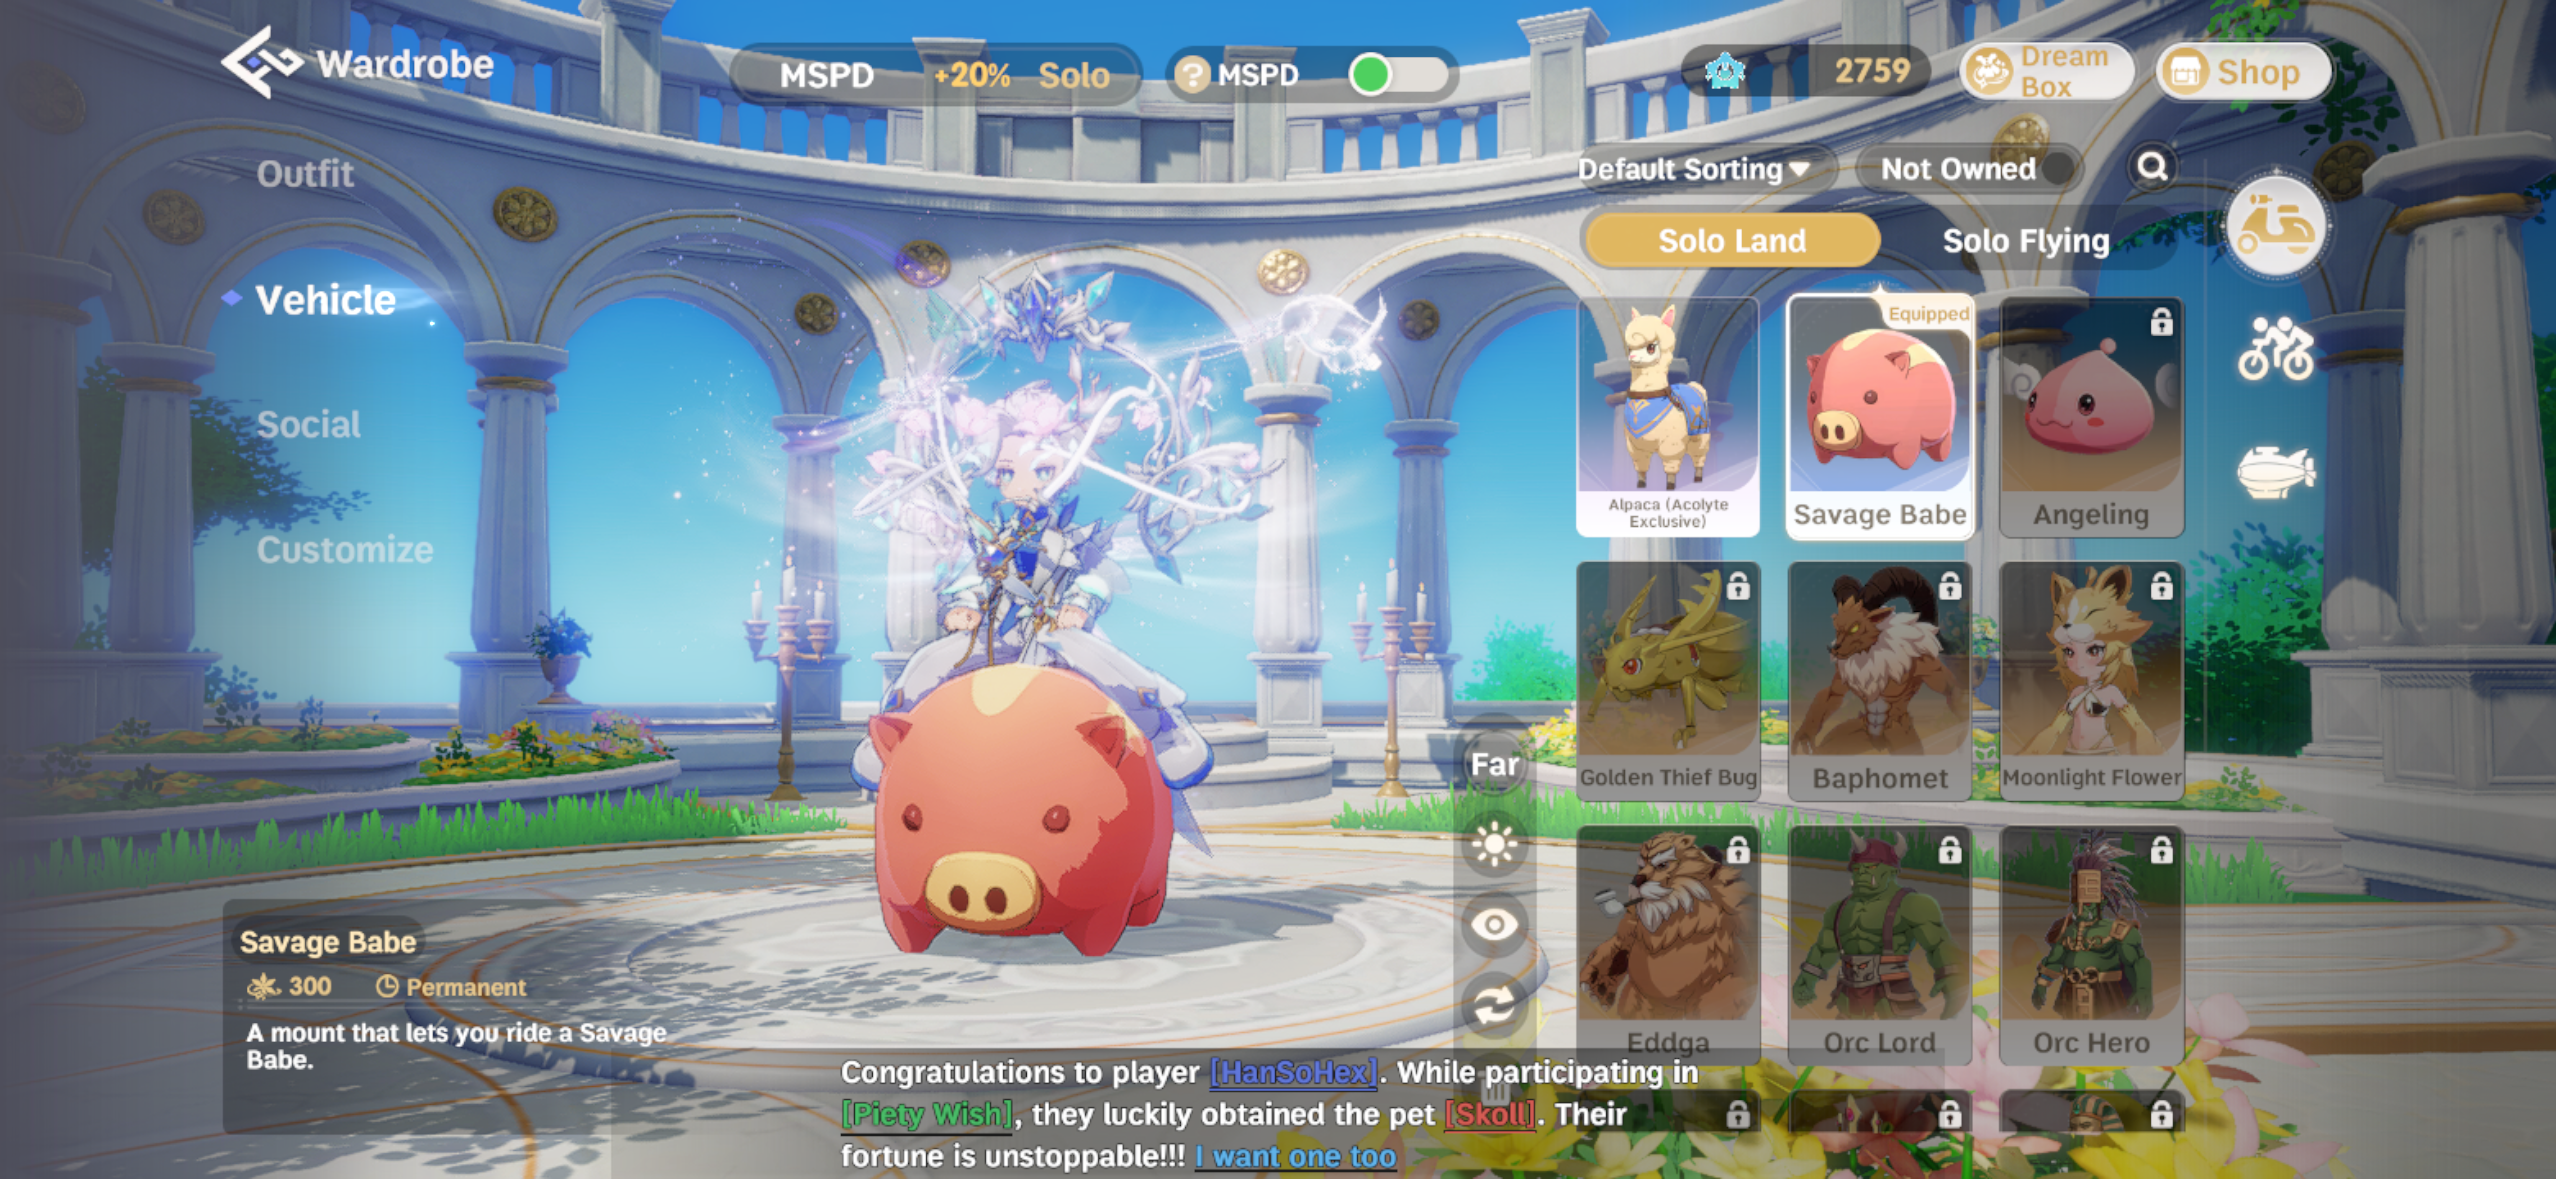
    Open the panel at the right side of the screen, pick Wardrobe, switch to the Vehicle tab, and choose the ride you want. That is the whole trick.

    Most guides cover where mounts come from, not how to swap them once you own a few.

    Think of the Vehicle tab as your garage. Every mount you own is parked there, and switching mounts is just picking another set of keys. Your character does not need to relearn anything, and you can swap back and forth as often as you like from the same tab.

    How to change your mount, step by step

    There are two ways into the same mount list. Pick whichever is faster for you.

    Path 1, from the main menu:

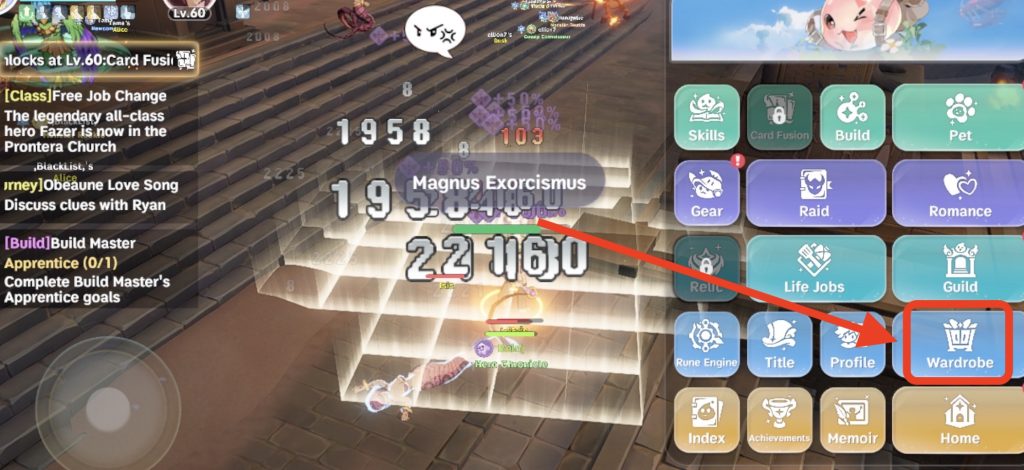
    1. Tap the menu button at the bottom right of the screen.
    2. Choose Wardrobe.
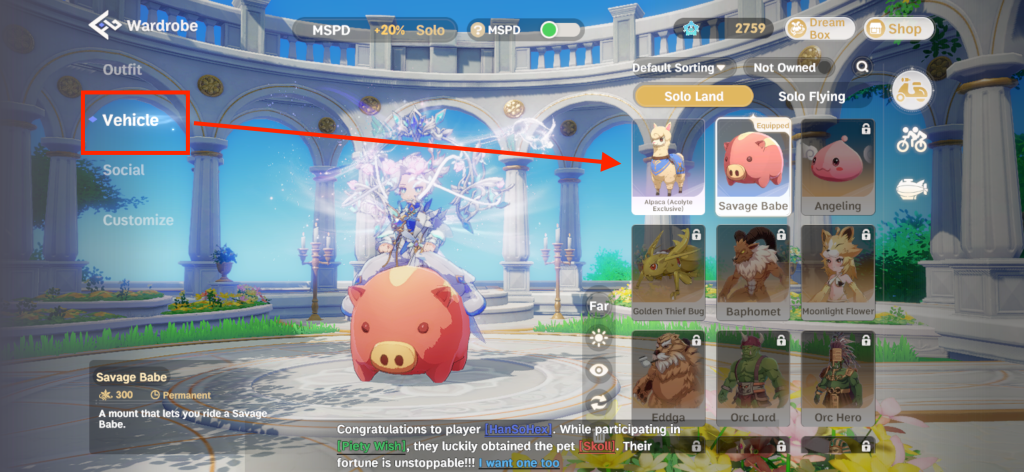
    3. Open the Vehicle tab. This is your mount collection. Everything you own shows here, from the starter Poring to MVP drops.
    4. Tap the mount you want to use. It equips instantly.
    Select “Wardrobe”
    pet mount banner
    Click “Vehicle” tab and select the mount that you want.

    Path 2, from your character:

    1. Tap your character portrait at the top left.
    2. Tap the portrait again inside the profile panel.
    3. Select the Vehicle tab from the row of options, which includes Outfit, Vehicle, Social, and Customization.

    Both paths open the same list, and the layout is identical on PC, where you click instead of tap. The game syncs your progress across phone, tablet, and PC, so a mount you equip on one device stays equipped on the others.

    How to ride and dismount

    With a mount equipped, the Ride button on your action bar mounts you up. Your character hops on and movement switches to ride speed. Press it again to dismount.

    One mount breaks the pattern. Mysteltainn, caught in Mount Mjolnir, does not carry you at all. It follows along behind you on its own, and watching its little feet drag is half the charm. Know that before you spend an orb on it.

    Mounts and pets: know the difference

    New players mix these up all the time, and the confusion costs them a few minutes in the wrong menu.

    Pets follow you and provide passive bonuses: auto-loot, stat boosts, or help in a fight. They deploy from the pet menu, not the Vehicle tab. Mounts are travel gear. They raise your movement speed across the open world and equip from the Vehicle tab.

    The two systems blur in some areas. Some evolved pets pick up small movement speed buffs that feel mount-like, and wild catches such as Mysteltainn are captured through the pet-catching minigame but used as mounts.

    When you are hunting for a new ride, the Vehicle tab is the source of truth.

    Mount rules worth knowing before you swap

    • Taking damage usually dismounts you, so do not open a mount mid-fight.
    • Indoor dungeons disable mounts. If the Ride button is greyed out, you are in a zone that blocks them.
    • PvP areas sometimes normalize mount speed, so a faster mount will not hand you an unfair advantage in a fight.
    • Some mounts are character bound, not account wide. Unlock one on the wrong character and it stays there. Check the mount’s entry in the Vehicle tab before investing in it.
    • Mount speed stacks with certain pet passives and garment cards. Farmers and merchants get the most from stacking these together.
    • Mounts move at different speeds. The bear, for example, is on the slow side at +20% run speed, while the class pet players compare it to gives +30%. If speed matters, compare the stat on each mount’s entry.

    How to get mounts in RO: The New World?

    SourceWhat you getNotes
    Beginner guideFree starter mount, a Poring-style companionArrives early through the beginner guide; the exact name varies by version
    Kill-count achievementsWolf, Vadon (the crab), Rocker, Ambernite, Picky Egg, FamiliarCheck Achievements under daily activities. The wolf takes 30,000 kills around Payon; the Vadon crab is another 30,000-kill milestone
    Encounter questsBigfoot bear, monkeyRandom quests that pop up as you play. Players report the bear quest triggering while refining gear and the monkey while crafting
    Job changeMotorcycleThe Gunslinger job line has its own motorcycle mount
    Wild catchMysteltainn (Godslayer)Found at Mount Mjolnir. Lower its resistance with milk, about three throws, then use an orb. The same system catches pets
    MVP dropsMVP mounts, flying mountsMVPs can drop mount items such as saddles, reins, or contracts, and your contribution ranking in the fight matters. The official store description says it plainly: defeat the MVP and make it your exclusive mount
    ShopsVarious mountsSome mounts are sold directly for in-game currency
    ExplorationBigfoot and other freebiesSome mounts come from simply wandering. One player reports getting Bigfoot after entering a house in Payon

    Gravity introduced the game’s first flying mounts around launch, with the promise that even MVPs can be mounts, so the collection only grows.

    FAQ

    How do I change mounts in Ragnarok: The New World?

    Open the bottom-right menu, go to Wardrobe, open the Vehicle tab, and pick the mount you want. The swap is instant.

    Why can’t I ride my mount?

    Three common reasons: you are in combat or just took a hit, you are in a dungeon that blocks mounts, or the mount is not actually equipped in the Vehicle tab. Pets are a separate system. A pet follows you; it does not replace your mount.

    Are mounts shared between characters?

    Not always. Some mounts are character bound, so equip them on the character you plan to ride.

    What is the easiest free mount to get?

    The beginner guide reward shows up first and costs nothing. After that, the wolf for 30,000 kills around Payon is the most straightforward kill-count mount.

    Do all mounts move at the same speed?

    No. The bear runs at +20% speed, slower than some alternatives, and mount speed can stack with pet passives and garment cards. Each mount’s entry shows its speed.

    Can I catch mounts like pets?

    Yes. Mysteltainn at Mount Mjolnir is caught like a pet: lower its resistance with milk, about three throws, then throw an orb. Aim carefully. The milk is bought with a currency you will want to save.